Rein the Drain: How to Stretch iPhone Battery Life
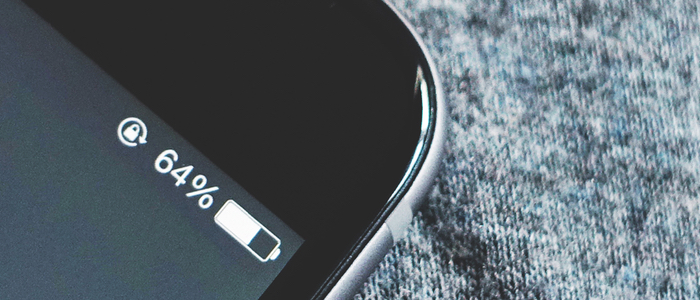
With ever-increasing reliance on smart phones, we all need to eek out more battery life from time to time. Small tweaks usually suffice until charging is available, but on a recent extended backpacking trip, I needed to drastically minimize drain to ensure 8 full days on one charge. By invoking the so-called “nuclear option” (described below), I essentially transformed my iPhone into a simple camera. Using it for pictures and nothing else, I experienced 5–6% daily battery loss while taking about 20 photos over the course of each day. That’s percentage points loss, so I went from 100% to 95% one day, then 95% to 89% the next, and so on.
Why take my iPhone instead of a camera? Because it was still a smart phone and provided good backup and emergency functions should WiFi or cell service become available.
Whether heading into an area with spotty service or just perilously low on juice, these battery-saving tips can help you avoid the dreaded low battery warning or worse, a dead phone.
The nuclear option
The easiest and simplest way to preserve battery is to:
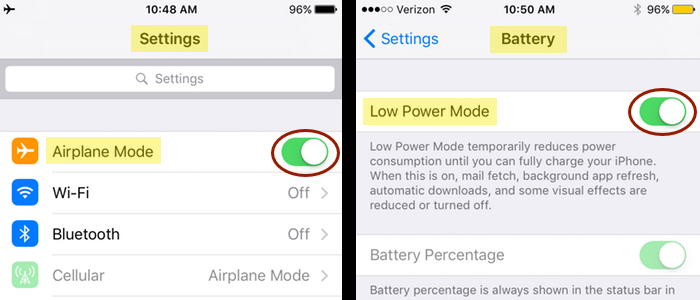
- Turn on Airplane Mode (in Settings): Even if the screen is dark, your phone is continually searching for and monitoring data connections. Airplane Mode turns off cellular, WiFi, and Bluetooth so you can’t browse the Internet, send or receive texts, calls, or emails, etc.
- Turn on Low Power Mode (in Settings/Battery): This mode allows phone, messaging, email, and Internet use (if not in Airplane Mode) but reduces screen brightness, shortens screen time-out, disables motion effects and animations, pauses background activities, and even reduces performance (making everything a bit slower).
Unfortunately, Airplane Mode also renders “Find my iPhone” useless, so use with caution. Given that I was backpacking and would have limited (and very slow) options to try to locate a lost phone, I was ok with Airplane Mode. This article, however, shows how to minimize data roaming and cellular use while retaining “Find my iPhone” and other services.
Note that when I took my backpacking trip, Low Power Mode automatically shut off when the phone was charged to 80% or higher (it no longer does so). I wanted to stay in low mode at all times, so instead of toggling one button, I had to manually change multiple settings as detailed below.
Close apps and change background settings
Although I mostly used my phone as a camera, I periodically took it out of Airplane Mode to access the phone, email, text messages, Internet, and map applications. To ensure minimal battery drain even when Airplane Mode is off:
- Close all apps: Swipe up to close apps before starting your trip, and if you use any during the trip (when briefly out of Airplane Mode), remember to shut them down after.
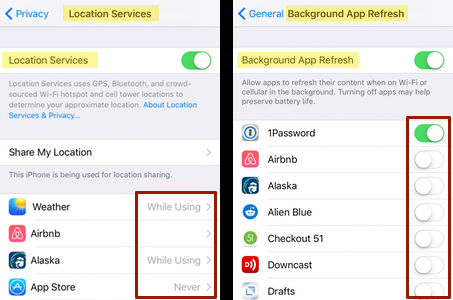
- Change all Location Services to “Never” or “While Using” (Settings/Privacy/Location Services): Some recommend turning this off altogether, but I needed GPS for the camera (so photos were geo-tagged) and a hiking map app. You do not need WiFi or cellular connection for GPS to work.
- Minimize apps using Background App Refresh (Settings/General/Background App Refresh): This function allows apps to refresh even when closed, so pare down to essential functions. I enabled things like 1Password, Dropbox, Evernote, OmniFocus, and Google Maps.
- Minimize Notifications (Settings/Notifications): This one’s tough since there’s no toggle button to turn all off at once. I left this alone entirely since I already changed the Background App Refresh settings and would only be opening a few targeted apps and then closing them immediately after use.
Adopt new habits
I’m an old dog who resists new tricks, so some of these were harder to remember than others:
- Swipe left to take photos: Likewise, swipe up for Airplane Mode. All extra navigation drains the battery, so minimize steps where possible. When I was traveling, I actually had to swipe up for photos; swipe left was enabled with iOS 10.
- Maintain moderate temperatures: If it’s hot out, keep in the shade. If cold, store the phone in a pocket next to your body, and at night bring it into your sleeping bag with you.
- Wear (and use) a watch: Don’t tap the phone for the time. Instead, use a digital watch for time and alarm.
- Power off at night: Powering off saves more battery than leaving it inactive or in sleep mode.
It’s also a good idea to keep your phone’s iOS updated to the most recent version.
If needed, manually change low power settings
As mentioned previously, Low Power Mode used to automatically shut off when the phone charged to 80% or higher. As a result, I didn’t use the one-shot Low Power Mode and had to manually:
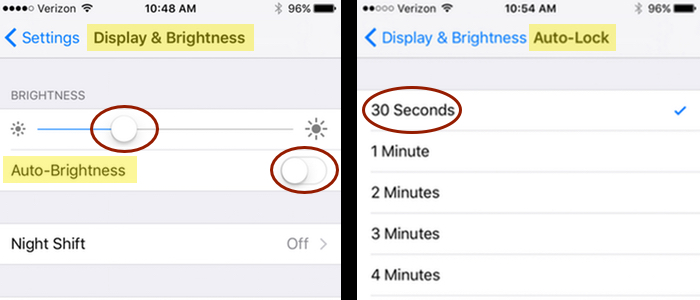
- Dim screen brightness (Settings/Display & Brightness): Turn off Auto-Brightness and reduce to 25% or whatever you can handle. This was another tough one for me; with a dim screen, it was hard to see what I was taking pictures of! You could also change to a dark wallpaper since bright/white images are a bigger drain.
- Turn off vibrate (General/Accessibility/Vibration): Vibrations use more power than ringtones.
- Shorten screen time-out (Settings/Display & Brightness/Auto-Lock): Change to the minimum 30 seconds.
That’s covers everything I did to achieve a battery loss of 5–6 percentage points per day when just using the phone for photos. Drain increased when I took it out of Airplane Mode to access other functions; thankfully, I was also able to periodically charge at waysides along the trail.
I never dropped below about 60%, but I was also traveling with a friend who brought a camera so we used her phone for essential communication. She also carried a SPOT device which tracked our location. On future trips into the backcountry, I will likely carry a solar charger or external battery backup. It would provide more flexibility and I’d like to use RunKeeper (a battery hog) for route and elevation tracking.
Whichever batter-saving options you decide to invoke, be sure to test in advance to have good data going into your trip.
